


In This Article Show
With the holiday just around the corner, you might be looking for fresh ideas to spruce up your home with that personal touch or searching for activities to keep the kids engaged and excited.
That’s where Thanksgiving crafts come into play. Not only do they add a special homemade charm to your decor, but they also serve as wonderful icebreakers and conversation starters during family gatherings.
In this post, I’ll share with you 11 simple yet memorable Thanksgiving craft ideas that are sure to elevate your holiday. Whether you’re a seasoned crafter or a beginner looking to create something special for the holiday, these crafts are designed to bring joy and a sense of accomplishment to crafters of all levels.
Thanksgiving Paper Garland
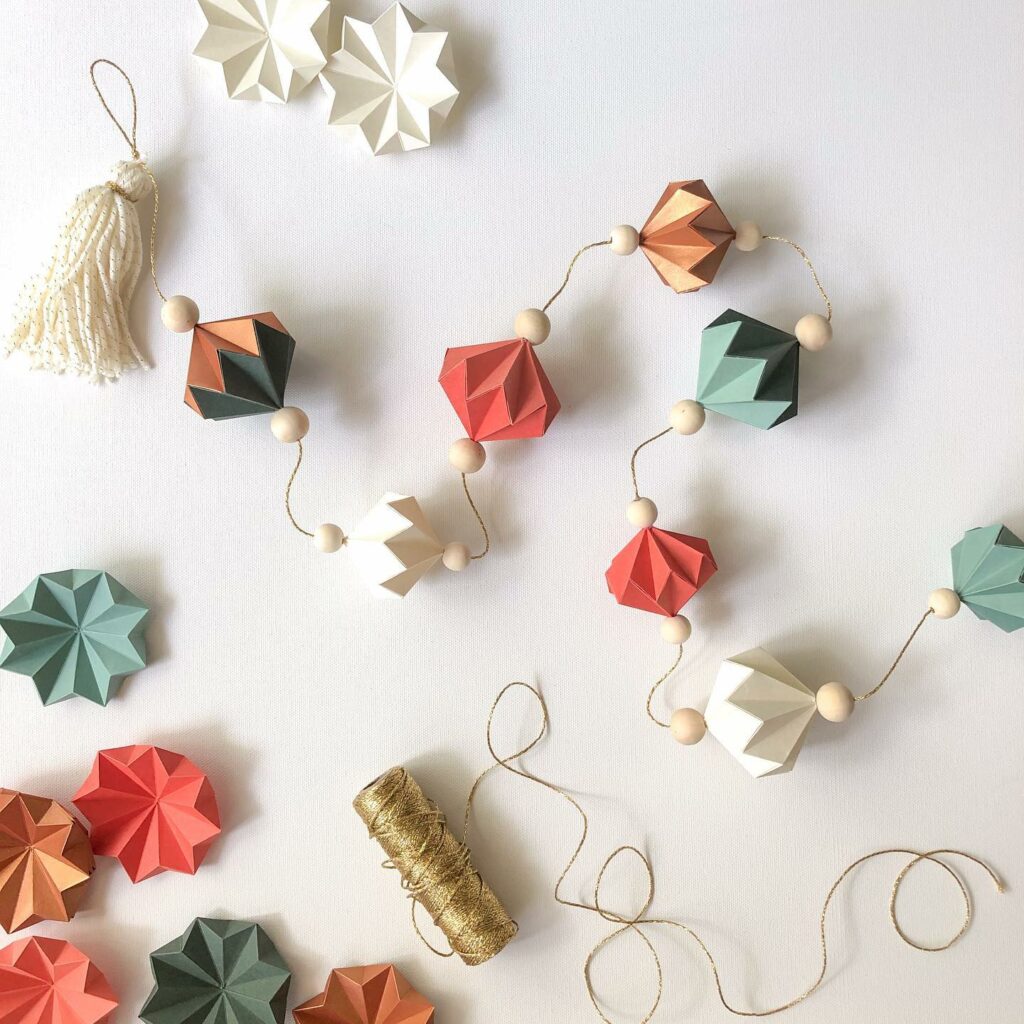
Creating a Thanksgiving paper garland is a wonderful way to add a personal touch to your holiday decor. It’s simple, and you can even get the kids involved. Here’s how you can make one:
Step-by-step Instructions
- Gather Your Materials: You’ll need construction paper or cardstock in autumnal colors, scissors, a hole punch, string or yarn, and markers or paint.
- Cut Your Shapes: Choose shapes that represent Thanksgiving, such as leaves, pumpkins, or turkeys. Trace and cut these shapes out of your chosen paper.
- Punch Holes: Carefully punch two holes at the top of each shape, making sure they’re aligned so your shapes hang straight.
- String It Up: Thread your string through the holes, adding a knot or a bead between each shape to keep them evenly spaced.
- Hang with Care: Choose a spot to display your garland, such as above the mantel or across the dining room window, and hang it up to add a festive touch to your space.
Handprint Turkey Puppets
Engaging children in holiday preparations can be both fun and meaningful. Handprint turkey puppets are an adorable and interactive craft that celebrates the essence of Thanksgiving. Here’s a simple guide to creating these little gobblers:
Guide to Creating Turkey Puppets
- Materials Needed: Construction paper in various colors, glue, scissors, popsicle sticks, and markers.
- Make the Handprints: Trace your child’s hand on a piece of construction paper. The fingers will be the turkey’s feathers, so let them spread their fingers wide!
- Cut and Decorate: Cut out the handprint. Then, decorate it with markers to add details like eyes, a beak, and a wattle.
- Attach the Stick: Glue a popsicle stick to the back of the cutout handprint to create the puppet’s handle.
- Dry and Set: Allow your turkey puppet to dry completely before the performance begins.
Gratitude Tree Centerpiece
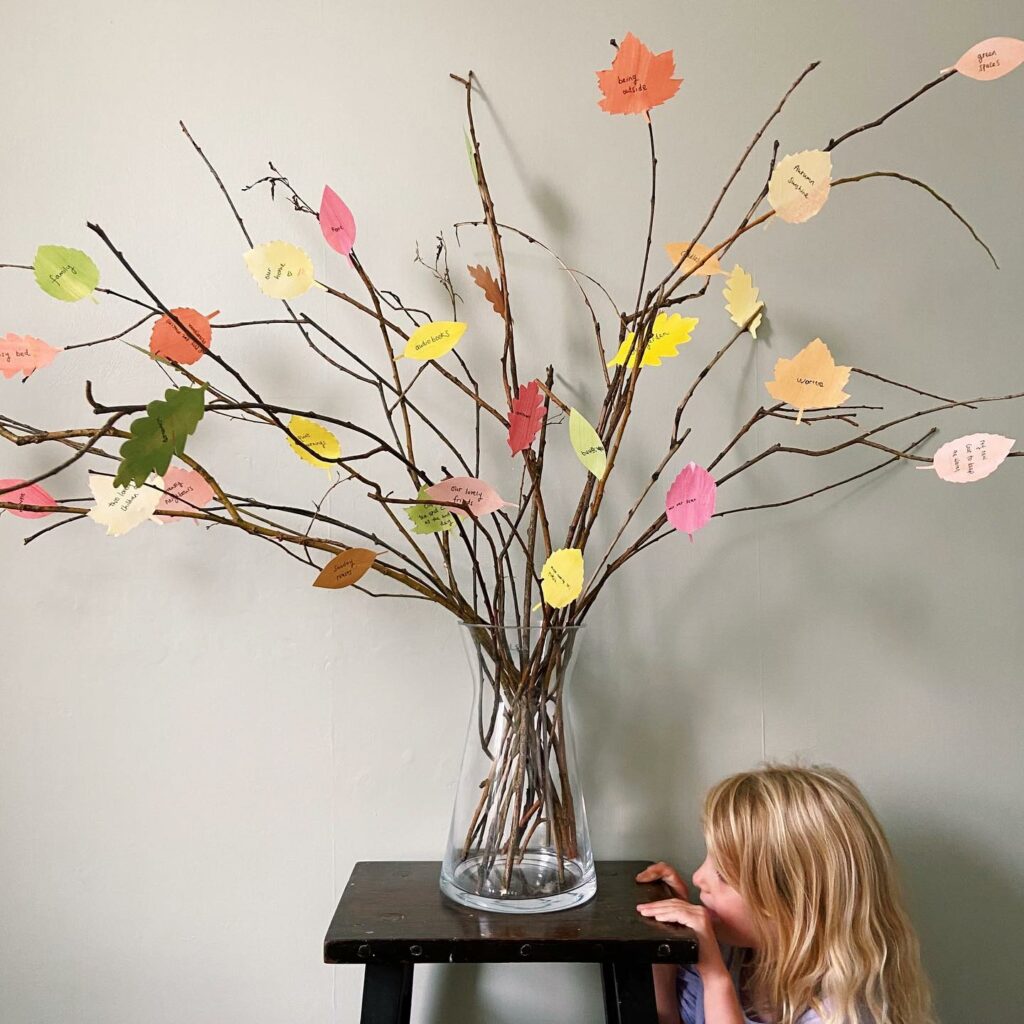
A gratitude tree is a visually stunning and meaningful centerpiece for your Thanksgiving table. It invites guests to share what they are grateful for, creating a powerful reminder of the holiday’s true meaning.
Great deals to snatch for your little ones 🎉


Instructions For Crafting a Gratitude Tree
- Collect Branches: Gather sturdy branches from outside for a natural look, or purchase artificial branches from a craft store.
- Prepare the Base: Use a vase or a jar as the base. If you’re using a transparent vase, consider filling it with pine cones, acorns, or even colored stones for added stability and aesthetics.
- Arrange the Branches: Place the branches in the vase, arranging them to resemble a small tree. Use floral foam if necessary to keep them in place.
- Create Gratitude Notes: Cut out paper leaves or tags from cardstock where guests can write their notes. Punch a hole at the top of each leaf and attach a loop of string or ribbon.
- Invite Participation: Place the leaves or tags along with pens or markers on the table where guests can easily write their messages.
- Hang the Notes: Guests can hang their gratitude notes on the branches throughout your gathering, transforming the tree into a blossoming display of thankfulness.
Pilgrim Hat Flower Pots
Transform ordinary flower pots into whimsical pilgrim hats that can serve as unique decorations or table favors this Thanksgiving. Here’s how you can create these festive planters with a few simple steps.
Tutorial on Transforming Flower Pots Into Pilgrim Hats
- Select Your Pots: Small to medium-sized terracotta pots are ideal for this craft.
- Paint the Pots: Use black paint suitable for terracotta to cover the entire pot and the saucer, which will serve as the brim of the hat. Allow them to dry completely.
- Add the Buckle: Cut a square buckle out of gold or yellow construction paper or felt. Glue this onto a strip of gray paper or fabric to create the band around the hat.
- Attach the Band: Once the pot and saucer are dry, glue the band around the rim of the upside-down pot.
- Assemble the Hat: Place the saucer on top of the overturned pot – the saucer will be the brim, and the pot itself is the top of the hat.
Autumn Leaf Mason Jars
Mason jars provide a rustic charm and are incredibly versatile for holiday decorations. Decorating them with preserved autumn leaves is a simple and effective way to bring the essence of fall indoors for Thanksgiving.
How to Decorate Mason Jars
- Gather Your Leaves: Collect fallen leaves in different shapes and colors. If they’re dry, gently press them between the pages of a book or use an iron to flatten them between sheets of wax paper.
- Prepare the Jars: Make sure your mason jars are clean and dry. For a frosted look, you could lightly spray them with a matte finish before you start.
- Attach the Leaves: Use Mod Podge or a similar adhesive to carefully apply each leaf onto the jar’s surface. Smooth out any bubbles or wrinkles with your fingers or a brush.
- Seal the Design: Once your leaves are positioned as you like, apply another layer of Mod Podge over the top to seal them in place. Allow it to dry completely.
- Add Finishing Touches: Tie a piece of twine or ribbon around the neck of the jar for that extra rustic accent.
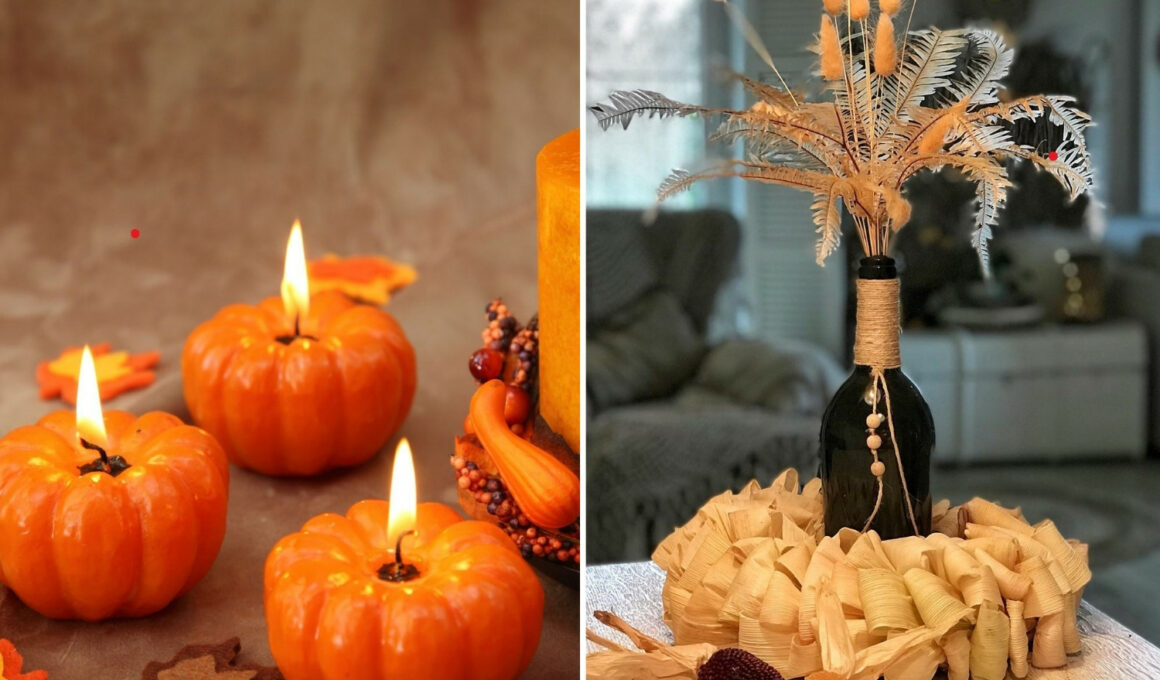
Pumpkin Spice Candles
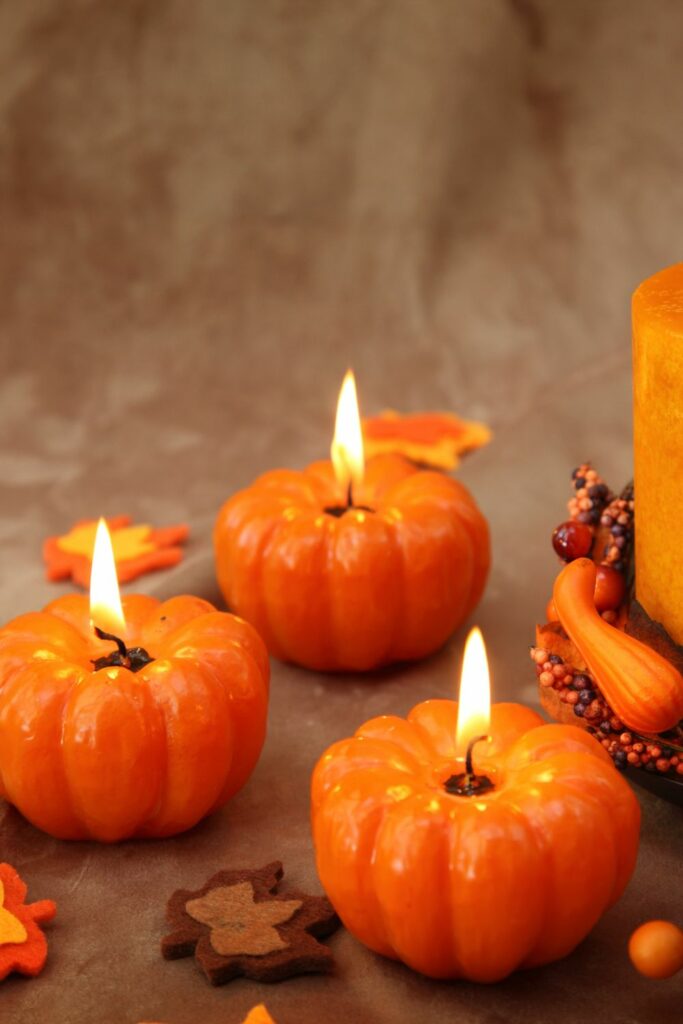
Embrace the quintessential scent of fall with homemade pumpkin spice candles. The warm, inviting aroma is a hallmark of the season, and crafting your own ensures your living space is filled with this favorite fragrance.
DIY Homemade Pumpkin Spice Scented Candles
- Gather Supplies: You’ll need soy wax flakes, pre-waxed wicks with tabs, a double boiler, candle molds or jars, pumpkin spice fragrance oil, and dye if desired.
- Melt the Wax: Use a double boiler to melt the soy wax flakes. If you don’t have one, a heatproof bowl set over a pot of simmering water works too.
- Add Color and Scent: Once melted, remove the wax from heat. Stir in the dye if you’re using it. Then, add the pumpkin spice fragrance oil — about 10 drops per pound of wax.
- Prepare the Molds: While the wax is melting, attach the wicks to the bottom of your molds or jars using a little melted wax to hold them in place.
- Pour the Wax: Carefully pour the scented and colored wax into your molds. Ensure the wicks stay centered and upright.
- Secure the Wicks: You can hold the wicks in place by laying a pencil or skewer across the top of the mold and wrapping the wick around it to keep it taut.
- Allow to Set: Let your candles cool completely. This can take several hours or even overnight.
- Trim the Wick: Once set, trim the wick to about a quarter of an inch above the wax.
Give Thanks Place Cards

Place cards are more than just a seating guide. They’re a personal touch that shows your guests you’re thankful for their presence. Here’s how to craft unique place cards that also serve as keepsakes for your Thanksgiving dinner.
Creative Methods for Crafting Unique Place Cards
- Leaf Place Cards: Gather large leaves from outside, or purchase artificial ones from a craft store. Write each guest’s name with a metallic paint marker for a natural, yet elegant look.
- Cork Holders: Slice a small slit in a cork to hold a card with the guest’s name. This can be a lovely nod to any wine enthusiast at your table.
- Miniature Pumpkins: Use small pumpkins or gourds as a base. Tags with guests’ names can be pinned to the stem or tied around the gourd with a festive ribbon.
- Wood Slices: For a rustic vibe, write names on small wood slices. They can be purchased at a craft store or made from branches if you’re handy.
- Thanksgiving Tokens: Double the place card as a takeaway token. Consider a small photo frame, a personalized ornament, or a baked cookie with the guest’s name iced on it.
Acorn Picture Frames
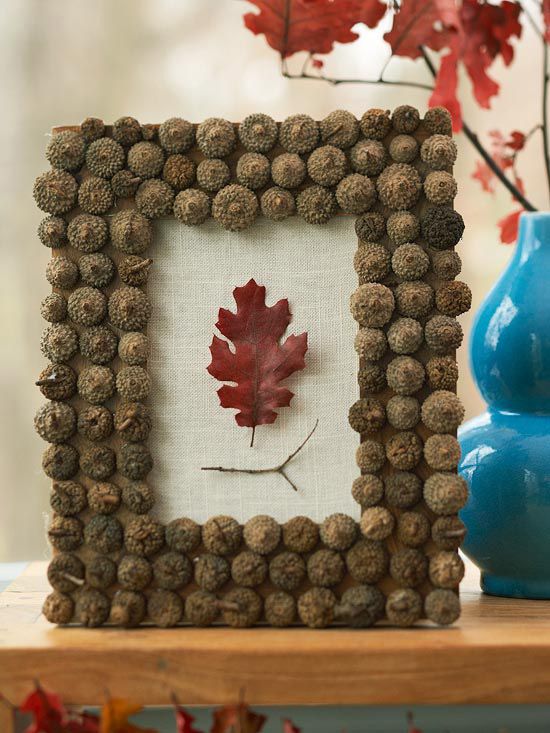
Adorning picture frames with acorns is a charming way to bring a piece of the outdoors inside for Thanksgiving. These natural elements can add a touch of autumn whimsy to your holiday decor and celebrate the beauty of the season.
Steps to Create Picture Frames
- Collect Acorns: Gather acorns from your yard or a nearby park. Choose a variety of sizes for visual interest, and make sure they are clean and dry.
- Prepare the Frame: Choose a simple, flat-faced wooden picture frame as your base. You may opt to paint it with autumnal colors such as deep red, orange, or gold for added effect, or leave it natural for a rustic look.
- Arrange Acorns: Before gluing, lay out your acorns around the frame to plan your design. Consider mixing up the orientation of the acorns for a more natural look.
- Glue the Acorns: Using a hot glue gun, apply glue to the bottom of each acorn and press it onto the frame. Hold each one in place for a few seconds to ensure a strong bond.
- Fill in Gaps: Once all the main acorns are in place, fill in any gaps with smaller acorns or pieces of acorn caps to create a full, lush look.
- Seal the Frame: If desired, spray the finished frame with a clear sealant to protect it from dust and to preserve the acorns.
Thankful Pumpkin Pie Boxes
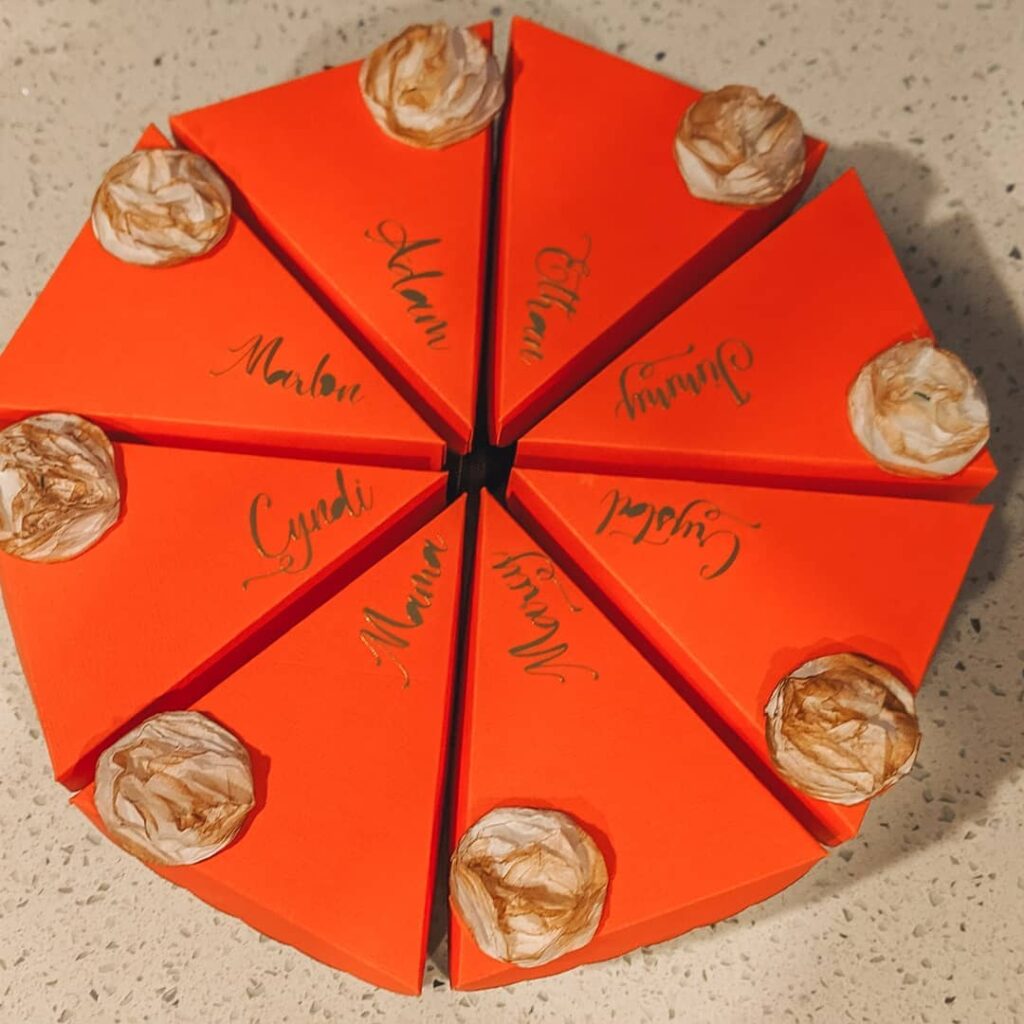
Creating pie-shaped boxes is a delightful way to package Thanksgiving treats, making them perfect for guests to take a slice of the festivities home with them. Here’s how to craft these charming boxes and some tips for presenting them as gifts.
Craft Ideas for Pie-shaped Boxes
- Designing the Box: Begin by designing or downloading a pie-slice box template.
- Choosing Materials: Use sturdy cardstock in shades of orange or brown for a pumpkin pie look.
- Assembly: Cut out the template, score along the fold lines for a clean edge, and assemble the box using glue or double-sided tape.
- Decoration: Draw or glue on details like ‘whipped cream’ using white paper or cotton balls. You can even create a lattice crust design for the top of the pie slice with strips of paper.
Corn Husk Wreath

A corn husk wreath captures the heart of autumn and celebrates the bounty of the harvest. Making one can be a delightful project, resulting in a piece that’s perfect for your Thanksgiving decor, whether you hang it on your door or use it as part of a centerpiece.
Guide for Constructing a Wreath From Dried Corn Husks
- Prepare the Husks: If the corn husks are not pliable, soak them in water until they soften. Pat them dry but leave them a bit damp so they’re easier to work with.
- Attach the Husks: Begin by gluing the end of a husk to the wreath form and wrapping it around. Continue this process, layering the husks and ensuring they overlap to cover the form completely.
- Secure the Ends: When you reach the end of a husk, glue the tip to the back of the wreath form to secure it. Start the next husk slightly over the last to maintain a uniform look.
- Trim the Wreath: Once the wreath form is fully covered, trim any uneven edges with scissors for a clean, circular shape.
- Let Dry: Allow your wreath to dry completely, preferably overnight, to ensure all the husks are securely attached.
Felt and Burlap Napkin Rings
Napkin rings are a detail that can elevate your table setting from ordinary to extraordinary. Using felt and burlap, you can create a textural and visually appealing detail for your Thanksgiving table. Here’s how to make your own.
Instructions for Handcrafting Napkin Rings Using Felt and Burlap
- Cut the Burlap: Measure and cut strips of burlap approximately 6 inches long and 2 inches wide. This will give you enough length to wrap around the napkin and overlap slightly.
- Cut the Felt: Cut a strip of felt slightly narrower than the burlap to create a layered look. The felt strip should be about 1.5 inches wide and 6 inches long.
- Attach Felt to Burlap: Use fabric glue to attach the felt strip to the center of the burlap strip. Press down firmly and let it dry.
- Create the Ring: Once dry, add a small line of glue to one end of the burlap strip and wrap it around a napkin to form a ring. Overlap the ends and press to secure.